

How To Draw Shapes In Photoshop
Are you a Photoshop beginner and want to learn how to draw diverse shapes using the Shape Tool in Photoshop 2020? Then this is the perfect tutorial that you demand to bookmark.
Photoshop Shape Tool let you lot to depict vector shape inside Photoshop. They are so good, you don't have to switch its counterpart, Adobe Illustrator, to depict vector unless there is specific feature you need. This tutorial for beginner will show y'all how to use the shape tool from scratch. In the cease, we will make a simple project of drawing a simple tree using the Shape Tools.
Preview
Hither's the vector tree we will describe using the Shape Tools.

Step ane
The best style to learn the usage of the tools is by practicing them. Start, we are going to make a new file. You can click the Create new button from the abode folio or clicking File > New. No demand to worry about the file dimension, annihilation will do.


Step ii
You can activate the Shape Tools from the Toolbox. Click and agree to open upwards all the Shape Tools. You tin use shortcut U and hitting Shift + U to curlicue through all the Shape Tools. In the Option Bar, select Shape to save the shape you created as a vector shape layer. If yous choose Path, the shape is going to be a vector path. If you choose Pixels, the result is going to be a pixel drawing on the active layer. For this tutorial, permit's cull Shape.

Step 3: Drawing Shape
To describe the shape, you just simply click and drag the mouse push. If you hold Shift, you tin can constrain a rectangle. If you agree Alt, you will describe from the eye out. Concur Alt and Shift to attain both. The prototype below bear witness the effect using Rectangle Tool. Information technology also works with Rounded Rectangle, Ellipse, and Polygon Tool.


Footstep 4
For more authentic event, you can click on the position where y'all desire the shape to exist. A dialog box volition pop up request for all the parameters.

Step v
The same goes for Rounded Rectangle and the other Shape tools.


Step six: Modifying Shape
You can change the shape properties after creating it from the Option Bar. Prepare the width and height of the shape from the W and H input box. For the polygon shape, you need to set the number of its sides before making the shape.


Step 7
Complete backdrop can be establish in the Properties panel. In the image below, the rectangle'south width is shortened by decreasing the W parameter. You tin can change the value of the parameter past "scrubbing" or dragging dorsum and forth over its letter.

Footstep 8
The rectangle shape is actually a Rounded Rectangle with 0 Corner Radius. If you desire to have uneven Corner Radius, click on the chain icon.

Step nine
Y'all can also modify the shape'south ballast point independently using the Directly Choice Tool. But, this modification will turn the shape into regular path and causing information technology to loose its properties. For instance, if you modify the rectangle below, its width and length properties volition gone. To confirm this modification, you accept to agree to the popped upward dialog box.

Pace 10: Fill and Stroke
Every shape has Fill and Stroke backdrop. Yous tin can make full your shape with solid colour, gradient, or pattern. brand sure the shape is selected and then click on the fill up box to select the content you lot desire. The empty box with diagonal line, ways no fill up. The second box is for solid color make full. Select the colour from the available listing at the lesser of the panel.

Stride eleven
The 3rd is for gradient make full. You can choose available list of gradient or make your own gradient in the long bar located at the bottom of the panel.

Stride 12
The last box is for blueprint make full. In the list, at that place are some blueprint ready to employ. If it's not enough, you can discover tons of free Photoshop pattern in the web. Just google for "Photoshop pattern". The Photoshop blueprint is saved in PAT format file. Click the panel menu and select Import Patterns and then select the PAT file you want to load.

Step 13
Stroke is a line that follow the shape. Click the Stroke box to choose the blazon of stroke you lot want. Similar to fill up, yous can choose solid color, gradient, or pattern. If you lot don't want to employ stroke, select the empty box with diagonal line.

Step 14
You tin can control the thickness of the stroke line in the Selection Bar.

Pace 15
Yous can also turn the stroke into dashed line. You can make your own stroke using the options at the bottom of the panel.

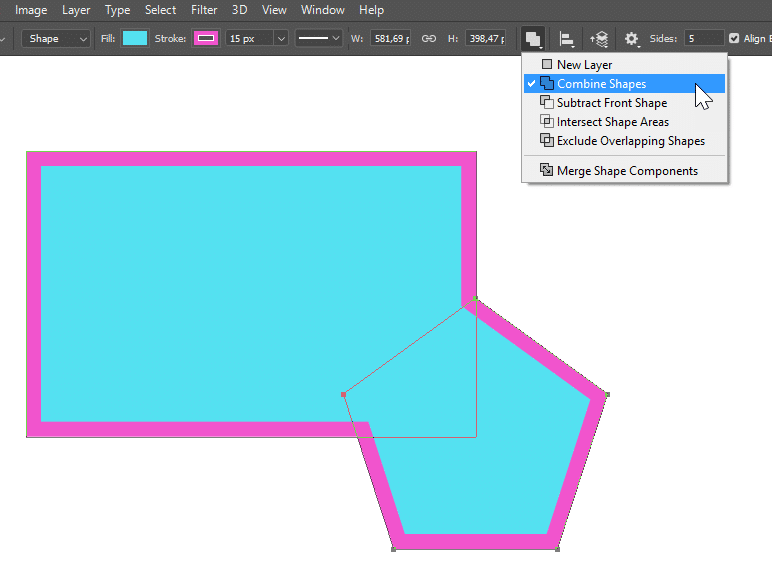
Step sixteen: Combining Shapes
In tools option menu, at that place are several options. The first, New Layer, will put every shape you make in a separate layer.


Pace 17
Cull Combine Shapes to add the new shape to the existing shape. Try the next three options to see the result.


Step 18
At the lesser, you have Merge Shape Components to merge all the shapes. When they are merged, all their backdrop is removed and and then basically turned into a vector path. A warning dialog box volition popular upwardly and if you are sure that's what yous need, only hitting the Aye button.


Pace xix
You can not modify the shapes backdrop anymore, but you tin freely modify each anchor point using the Directly Selection tool to suit your needs.

Step xx
The shapes combination is based on its stacking position. The image below made up of a rectangle at the bottom, a circle, and a star polygon at the top. The rectangle is combined with the circle and then subtracted by the star. We can place the polygon star between the rectangle and the circumvolve by selecting it and click Send Shape Backward.

Footstep 21: Align and Distribute Shapes
When y'all have two or more shapes in the same layer, you can align them and distribute their distance. Select the shapes using Path Selection tool and and so click one of the alignment or distribution in the tool option menu.

Footstep 22
And in that location'southward Line tool to draw a line, obviously. Very simple to use, just prepare the line thickness from the tools selection bar. Click and drag to draw the line.

Step 23: Line Tool
Hold Shift to draw a vertical line, horizontal line, or at increment of 45 caste angle.

Step 24
You tin besides add arrowhead to the start or end of the line. Activate information technology from the tool option drop downwards carte du jour.

Pace 25: Custom Shape Tool
And last but not least, we have Custom Shape tool. From the tool option drow down card, selection the shape yous want to draw. Click and drag to draw the shape. Hold Shift primal to constrain its proportion.

Step 26
The shape can be modified using Direct Selection tool. Click and drag to select its anchor points. Y'all can then move them to suit your needs.

Step 27: Cartoon a Vector Tree
Finally, let'due south apply the above theory to make something real. A simple vector tree. Showtime, we're going to draw the leaves. Activate the Ellipse tool and select greenish for its Fill. From the fill drib down carte du jour, click the rainbow box icon to select the color. Click and drag to draw a light-green ellipse.

Step 28
From the tool option drop down menu, select Combine Shapes and and so draw more ellipses.

Footstep 29
Simplify the shapes by merging them into one vector shape. Select Merge Shape Components. A dialog box pops up asking for your confirmation. If you feel bellyaching with information technology, since nosotros're going to do this a lot, feel free to check the Don't show over again option.

Footstep 30
Make certain the shape is selected and then click Edit > Copy or Ctrl + C. We are going to combine this shape with other leaves in the upcoming steps.

Step 31
Describe another leaves made of ellipses. This time, the color should be lighter.

Pace 32
Merge the shapes and and so while the shape is nevertheless selected, hit Ctrl + V to paste the original leaves nosotros copied earlier. If the leaves shapes is pasted onto new layer, maybe your second leaves shape is not selected. Y'all tin can re-select the shape using the Path Option tool. Set the pasted shape to Intersect Shape Areas.

Step 33
The paste shape will intersect the existing leaves shape. Resulting in a darker shade of leaves.

Step 34
We are going to echo the process 1 more than fourth dimension. Draw some ellipse shapes with lighter dark-green color. Merge them all.

Stride 35
Paste the commencement leaves shape and set it to intersect the existing shape.

Step 36
Draw some circles as the fruits.

Stride 37
Virtually done. Hang on. Draw a brown rectangle shape to be used as the tree trunk. Activate the Direct Select tool and and so drag one of the shape corner to change its shape.

Step 38
In the Layers panel, place the trunk vector shape at the bottom, underneath the leaves.

Determination
This is what we accept at present, a tree fabricated from vector shapes. Plainly, there are many potential we can explore from Photoshop'due south vector capabilities. Hope you relish the tutorial and learn ane or two things from information technology.

How To Draw Shapes In Photoshop,
Source: https://www.psdvault.com/basics/shape-tool-photoshop-2020/
Posted by: samuelthelle.blogspot.com
0 Response to "How To Draw Shapes In Photoshop"
Post a Comment